Best Way to Redirect All HTTP to HTTPS in Windows IIS 10
Transitioning a website from HTTP to HTTPS has become an increasingly important step for security, SEO, and user trust. HTTPS encrypts the connection between a website and visitors, protecting sensitive information from interception. Google also favors HTTPS websites in search rankings. In this guide on how to IIS Redirect HTTP to HTTPS with Windows 10, we’ll walk through the process of configuring IIS (Internet Information Services) to redirect all HTTP requests to HTTPS. We’ll cover obtaining a TLS/SSL certificate, binding it in IIS, and setting up URL rewrite rules to redirect HTTP to HTTPS.
After following these steps, your website will automatically switch all visits from HTTP to encrypted HTTPS, ensuring a secure connection for your users. Migrating to HTTPS is straightforward, with the proper IIS configuration on Windows 10.
Key Takeaways
- Obtaining a TLS/SSL certificate is the first step to activating HTTPS on a website.
- IIS must be configured to bind the TLS/SSL certificate to the website.
- URL rewrite rules in IIS redirect all HTTP requests to HTTPS.
- The HTTP to HTTPS redirect should happen with a 301 redirect for SEO.
- HSTS and other security headers further enhance HTTPS security.
- After setting up the redirect, links, and assets on the site may need updating.
Prerequisites
- A domain name for the website pointing to the Windows 10 server IP address.
- Ownership/control of the domain name to install TLS/SSL certificates.
- Administrative access to the Windows 10 server running IIS.
- Familiarity with accessing IIS Manager and configuring settings.
Obtain a TLS/SSL Certificate
The first step in enabling HTTPS on a website is obtaining a TLS/SSL certificate, which allows encrypted HTTPS connections. There are a few options:
- Purchase a certificate: The most common option is to purchase a TLS/SSL certificate from a trusted Certificate Authority (CA) like DigiCert, Entrust, or GoDaddy. The CA will validate ownership of the domain name. Costs typically range from $50-$150 per year.
- Use Let’s Encrypt: After validating domain ownership, Let’s Encrypt provides free 90-day TLS/SSL certificates. They need to be renewed manually every 90 days. Let’s Encrypt certificates work well for testing or short-term use.
- Generate a self-signed certificate: For testing purposes only, you can have IIS generate a self-signed certificate. This will encrypt the connection, but browsers will warn visitors since a trusted CA does not sign the certificate. It is only recommended for development/testing.
The process below covers using a certificate purchased from a trusted CA, which is recommended for production websites.
Bind the TLS/SSL Certificate in IIS
Once you have a valid TLS/SSL certificate file from a CA (or self-signed cert for testing), it needs to be installed/bound in IIS on the Windows Server.
Here are the steps:
- Open IIS Manager on your Windows 10 server (search for “IIS” to find it).
- In the Connections panel on the left, expand the Sites section and select your website.
- In the Actions panel on the right, click Bindings.
- Click Add, and in the Type dropdown, select https.
- In the SSL certificate field, select your TLS/SSL certificate file.
- Fill in the required details, such as hostname and IP address.
- Click OK to add the HTTPS binding.
Redirect HTTP to HTTPS in IIS
Now that HTTPS is enabled, we need to configure IIS to redirect all HTTP requests to use HTTPS instead. This is accomplished using URL rewrite rules.
Here are the steps to set up a permanent 301 redirect from HTTP to HTTPS:
- Install the IIS URL Rewrite module and open the IIS Manager.

- In IIS Manager, select your website and double-click URL Rewrite.
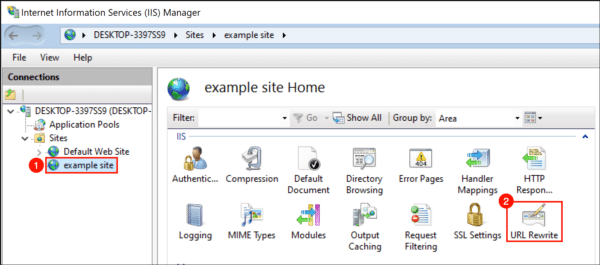
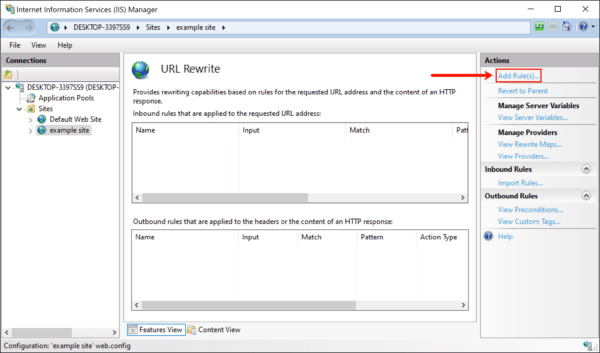
- Click “Add Rule(s)…“.
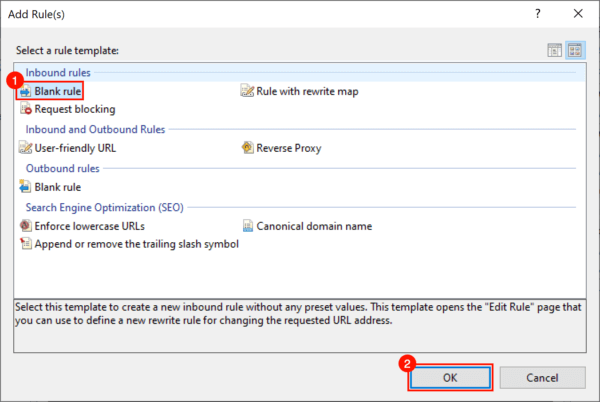
- Under Inbound rules, select “Blank rule” and click OK.
- Name your redirect something memorable.
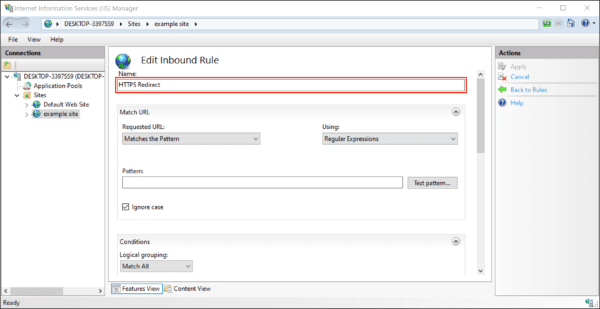
- In the Matched URL section:
- Set Requested URL to “Matches the Pattern”
- Set Using to “Regular Expressions”
- Enter “(.*)” as the Pattern
- Check “Ignore case“
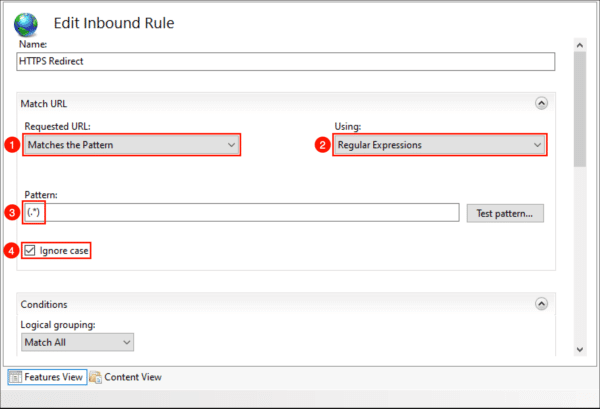
- Under Conditions, expand if needed. Choose “Match All” for Logical grouping and click “Add…“.
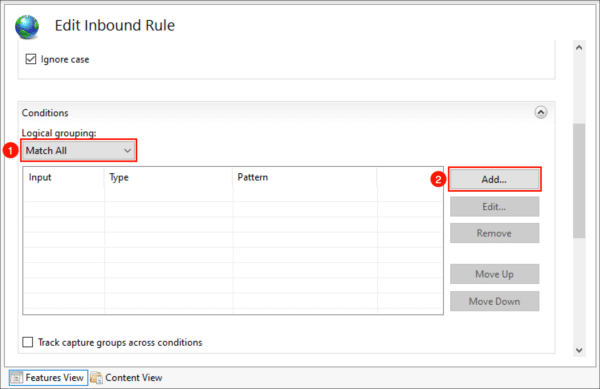
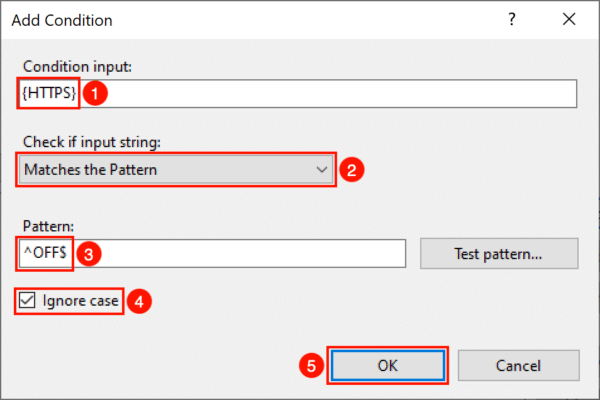
- In the dialog box:
- Enter “{HTTPS}” for Condition input
- Set “Check if input string” to “Matches the Pattern”
- Type “^OFF$” for the Pattern
- Check “Ignore case“
- Click OK
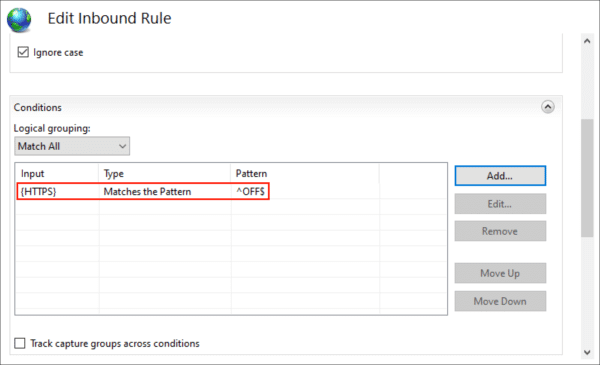
- Your condition now appears in the list.
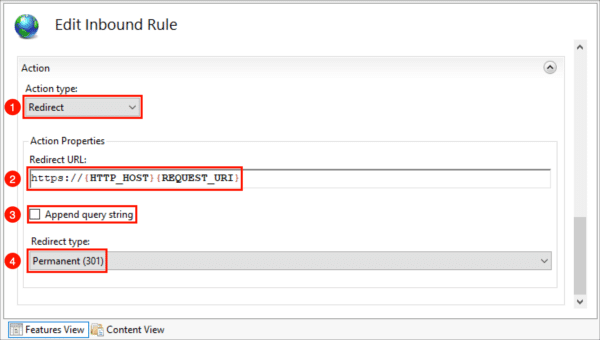
- In the Action section:
- Select “Redirect” as the Action type
- Enter “https://{HTTP_HOST}/{REQUEST_URI}” for the Rewrite URL
- Uncheck “Append query string“
- Set Redirect type to “Permanent (301)”
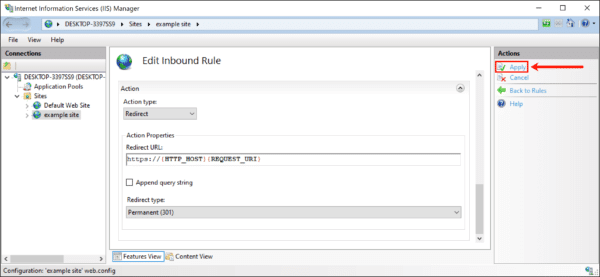
- Click “Apply” in the Actions menu on the right.
- To verify your redirect: Test it in a web browser, If issues occur, review the site’s web.config file for accuracy:
- In IIS Manager, right-click your site
- Select “Explore” from the menu
- Check web.config for the correct redirect information

- Ensure web.config is present, then open it with a text editor.

- Verify that web.config contains the following text. If necessary you can create and/or modify this file:
<?xml version="1.0" encoding="UTF-8"?>
<configuration>
<system.webServer>
<rewrite>
<rules>
<rule name="Redirect to HTTPS" stopProcessing="true">
<match url="(.*)" />
<conditions logicalGrouping="MatchAll">
<add input="{HTTPS}" pattern="^OFF$" ignoreCase="true" />
</conditions>
<action type="Redirect" url="https://{HTTP_HOST}/{REQUEST_URI}" appendQueryString="false" redirectType="Permanent" />
</rule>
</rules>
</rewrite>
</system.webServer>
</configuration>
That’s it! Now, when visitors go to the HTTP version of any page on your site, IIS will return a 301 redirect to the HTTPS page. The 301 code also tells search engines like Google to update links to the HTTPS URL, which helps avoid duplicate content penalties.
Enhance Security with HSTS and Other Headers
Along with the HTTPS redirect, you can enhance security further by adding some response headers.
- HTTP Strict Transport Security (HSTS): This header tells browsers to only interact with the site over HTTPS, preventing insecure HTTP access and sure SSL stripping attacks. Add the header with a prolonged expiration of like one year (31536000 seconds).
- Content Security Policy (CSP): CSP restricts external resources like JavaScript being loaded on your site, mitigating cross-site scripting attacks. Set a restrictive policy blocking unsafe sources.
- Referrer Policy: The Referer header can leak private page URLs to third-party sites. Setting this to “same-origin” prevents sending the header on cross-origin requests.
- Feature policy: Feature policies allow you to block browser APIs, like geolocation access, on your site for privacy. Set a restrictive policy based on your site’s needs.
These headers have been added to IIS under HTTP Response Headers for your site. They significantly strengthen security beyond HTTPS.
Update Links and Assets
One final step after redirecting to HTTPS is to update all links and assets across the site. Any hardcoded HTTP references will break after the redirection.
- Use absolute URLs beginning with HTTPS:// for links instead of protocol-relative links.
- Audit images, scripts, stylesheets, and other assets to replace any HTTP references.
- Update sitemap XML files and submit them to search engines.
- Implement canonical tags pointing to the HTTPS URLs as an extra precaution.
Taking these steps ensures everything transitions smoothly to HTTPS after setting up the redirect in IIS.
Conclusion
Migrating to a website to HTTPS strengthens security for your visitors and improves SEO rankings. By following the steps outlined in this guide, you can reliably redirect HTTP to HTTPS using IIS URL rewrite rules on Windows 10.
The most essential requirements are obtaining a valid TLS/SSL certificate and binding it to your site in IIS. Then, implement a 301 permanent redirect from HTTP to HTTPS along with security response headers.
Finally, audit your links and assets to replace any leftover HTTP references. This entire process can usually be completed in just a few hours, ensuring a smooth transition to HTTPS.
Frequently Asked Questions (FAQ) Related to IIS Redirect HTTP to HTTPS
What are the benefits of redirecting HTTP to HTTPS?
Some key benefits include:
- Encrypts all traffic to the site, protecting user privacy and data security.
- Prevents warnings if visitors accidentally access over HTTP.
- Can improve search engine rankings as Google favors HTTPS sites.
- Gives visitors added trust and confidence in the site’s security.
Will my site rank better after migrating to HTTPS?
Google has stated HTTPS is a positive ranking factor. Migrating to HTTPS can provide a slight boost in search rankings, but it is just one of many factors that influence rankings. Focus on improving overall site quality and user experience.
How do I test that the HTTP to HTTPS redirect is working?
Try accessing your site over HTTP and validate that it automatically redirects to HTTPS without any certificate warnings. You can also use online tools like Redirect Checker to confirm the 301 code is returned.
Should I redirect HTTP to HTTPS with meta refresh or JavaScript?
No, those methods are not recommended. Use a server-side 301 redirect at the IIS level instead. This is faster, preserves link equity, and is best for SEO. Browser-side redirects should be avoided.
What’s the difference between HSTS and 301 redirect?
The 301 redirect forces individual requests from HTTP to HTTPS. HSTS tells browsers to avoid HTTP requests entirely and only use HTTPS for the site moving forward. They provide security in different ways.
How can I check if HSTS and other security headers are correctly configured?
Use a header checker tool like SecurityHeaders.com to validate that your expected security headers are present and configured correctly after making changes in IIS.

Priya Mervana
 Verified Web Security Experts
Priya Mervana is working at SSLInsights.com as a web security expert with over 10 years of experience writing about encryption, SSL certificates, and online privacy. She aims to make complex security topics easily understandable for everyday internet users.


